
Chess!
Posted: June 3, 2011 Filed under: Build Leave a commentMy son has been in his school chess club since preschool. He loves playing it. I’m not very good at it (he’s 6 and can beat me sometimes), but there’s one thing I’ve always loved: big garden chess boards that you walk around on top of to move big chess pieces.
So I decided to build one.
The Design
I decided to build the pieces out of flat stock because it’s easy to get, affordable, and I know how to work it. I decided on a hinged base so they would fold and lay flat.
Aside: I discovered http://amazonsupply.com/ during this project. It’s awesome!
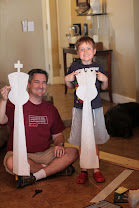 My son helped me design the pieces. He drew what he thought they should look like on Post-It notes and I sketched them on big butcher paper to make templates. The King is three feet tall. The Pawns are 2 feet tall and everything else is somewhere in between. It only takes 6 templates to make all 32 pieces, so that went pretty quick.
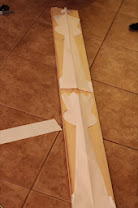 Then we traced the templates on to 1×8” pine. I bought 6’ pre-cut boards of select grade stuff and put 2 tall pieces or 3 pawns on a board.
Cutting
This part takes a while. You have to carefully cut 32 pieces out of 8” boards with a jigsaw or bandsaw. I bet if I had a bandsaw, I could cut out a stack of 2-4 pieces at a time. I don’t have a bandsaw. I bet if I transferred the templates to a piece of hardboard first, I could have cut them using a straight-cutting router bit with a guide bearing. I didn’t do that. I cut all 16 pawns the hard way.
Then I sanded everything and routed the edges so they’re rounded over. It makes the pieces feel nice in the hand.
Painting
My son picked the colors. He said the white side should match the rocks in our back yard and the black side should match the pool fence. He got his design skills from his mom. We put drop-cloths in the yard and put 1 coat of primer followed by 2 coats of paint on both sides of all 64 pieces (including bases). This was a good family part of the project: no power tools or loud noises, just a lot of painting.
Assembly
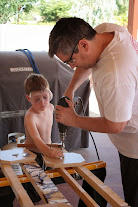
This was another good family part of the project. Each piece needed a hinge attaching the base to the figure. Then each base needed an angle bracket and each figure needed a threaded insert. When you stand the piece up, a thumb screw goes through the bracket and into the insert.
The Board
The base of each piece is 9¼” wide. I went with 12” pavers to be the black squares on my board. The white squares are just the same gravel as the rest of the yard. It didn’t look quite right until I added the border of bricks all the way around. It makes it look like the white squares along the edges are part of a chess board, not encroaching yard.
Playing
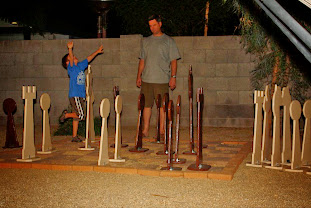
All together, this set took about 10 weekends of work (not totally full, just… a lot of work), but I’m glad I did it.
Cherry Tower Desk
Posted: March 30, 2011 Filed under: Build 2 CommentsSometimes I make the joke that I build stuff because there’s stiff competition: my wife made two people. I’m just trying to keep up.
We need a new desk. My wife really liked Ana White’s Parson Tower Desk, and she bought me a Kreg Jig (she’s the best!). I liked the construction technique, but the dimensions were a little off for us. I also tweaked the materials.
I found great 30” cherry wood turning blanks at Woodworker’s Source. They’re 2” x 2” square and surfaced on all 4 sides. They are a little pricey (especially since I needed like 16 of them for this project), but I don’t have a planer or jointer at home, so I needed something already surfaced for a nice clean fit. They also had a gorgeous sheet of ¾” cherry plywood to make the shelves.
I’m particularly proud of this little feature: I added a cable tray underneath the back edge of the desk and I got a Big power strip that stays in there. Everything is plugged in to the strip, so there’s just one power cord coming off the back corner of the desk. The back still looks like this:

but the front just looks like this:

My wife found a stainless desktop at Ikea. I think its name is SANFRID. Put it all together and add several coats of Maloof oil/poly blend, and you get a desk!

I still don’t feel like this evens things up. My wife made two people. All I made was a desk.
Weekend Project: Drop-leaf Table
Posted: June 11, 2010 Filed under: Build Leave a commentJessica found this gate-leg table at Crate & Barrel. It looks kind of like this:

Big Table
But when you fold it up, it gets small…

Small Package
I Decided to Build One
They had a bunch of pictures on their site that made it easy-ish to work out the dimensions. I used poplar for the box & table top and pine for the gate legs. Here’s how it went in my garage. Your lumber and tools may vary.
Materials List
- 3 ea. 12′ 1 x 12 boards
- 3 ea. 8′ 1×3 boards
- 3 ea. 8′ 1×2 boards
- 2 ea. 30″ piano hinges
- 6 ea. little table feet
- 1 wooden dowel, 3/8″ @ 6″ or longer
- wood filler, brads, biscuits, & glue
Cut List (actual dimensions)
- 1 ea. 36 x 8 x 0.75 (top)
- 1 ea. 36 x 9.5 x 0.75 (bottom)
- 2 ea. 29 x 8 x 0.75 (sides)
- 4 ea. 34.5 x 2.5 x 0.75 (inside rails)
- 4 ea. 2.5 x 2.5 x 0.75 (inside blocks)
- 6 ea. 11.25 x 36 x 0.75 (for the tabletop)
- 2 ea. 28.875 x 1.5 x 0.75 (inboard gate legs)
- 2 ea. 30.5 x 1.5 x 0.75 (outboard gate legs)
- 6 ea. 14 x 1.5 x 0.75 (gate rails)
Tools
- Circular saw or table saw
- Router with chamfer, straight cut, and roundover bits
- Pneumatic brad nailer and an air compressor.
- Coping saw
- Biscuit joiner
- Clamps
What to do
Cut the tabletop boards to 36″, join them with biscuits & glue, then clamp them up. I made one 72 x 33.75″ tabletop and cut it in half, then I stacked them and ripped it to the correct size (36 x 28.25″). On reflection, it would be easier and better to use a big sheet of fancy plywood. I’d go thicker than 3/4″ too. Maybe 5/4.
Make the top & bottom boards from the leftover 1 x 12. Drill 3/8″ holes in the top & bottom. The box-top holes should be 3/8″ deep and about 7/8″ from each side. The box-bottom holes should go all the way through and located about 1-5/8″ from each side. Both should be centered along the board’s length.

Top of the Box
Cut slots for the gate legs to pass through the bottom of the table box. Mark where the legs hit the box and make your slot a little wider than that. Use your router & straight-cut bit for a neat edge, or a little coping saw if you’re steadier than I am.

Bottom of the Box
Cut the slots for biscuits in the top, bottom, and sides of the table box. Depending on your biscuit joiner’s design, you may not be able to do this after the braces are installed in the top & bottom, so do it now.

Side
Cut the hand-holds in the sides next. Drill a pair of 1″ holes, 3″ apart, centered 5″ from the top of each side. Use a coping saw to knock out the wood in between & sand it to shape. When you get the edges nice & straight, use a 1/4″ roundover bit on the inside and outside of the hole for a comfy grip.
Build the braces to go in the bottom and top of the box and attach them.
There are two 1 x 3 rails that run from end to end, and a block at each end (another piece of 1 x 3 @ 2.5″ long). For the bottom of the box, that’s it. Glue it to the bottom and hold it in place with some brads from underneath.
For the top, add some additional pieces of 1 x 3 against the box top so you can secure it with brads and not mess up your pretty tabletop.

This is the top brace. The bottom brace is simpler.
Attach the sides to the bottom and top. Use some biscuits & glue to stick it all together. Check for square and then use some brads through the sides into the braces to hold everything in place.
Attach the table leaves to the box using the piano hinges. Do this on a flat, clean surface to avoid marring your tabletop. Chamfer the edges of the tabletop and the narrow edges of the box top.

Gate Leg (x2)
Build the gate legs by attaching an inboard gate leg, outboard gate leg, & 3 rails. The tops of the legs should extend 3/4″ above the top rail. The outboard leg should be 3/4″ longer at the bottom than the inboard. Use FF biscuits and glue to hold it together. Use a rasp or handsaw to knock a little bit of material off of the front corner of the inboard leg so it will clear the piano hinge. You’ll see why when you fit it later.
Drill 3/8″ holes in the gate legs 3/8″ deep centered in each end of the leg’s inboard side. Cut some dowels to hold the gate legs in place. The top one should be about 3/4″ long, and the bottom one should be about 1-1/2″. Fit it together to see how it works.
Carefully dry-fit the legs and make sure you like the way they operate. When you have it fit the way you want, put a dab of glue on the bottom end of the bottom dowel and put it all in place. Hold it with a little tape until the glue dries. Cut any excess dowel flush with the bottom of the box. Once this goes together, the only way to get the gate legs out is to cut them, so fit carefully.
Install the table feet. I put 4 on the bottom of the box, plus one on each gate leg.
Fill and sand the brad holes. Sand everything smooth, particularly the tabletop. Prime & paint it and you’re done.
It works!
This makes a very spacious desk that you can set up to work from home for a day then stow away when you’re done. I tried it.
If I had it to do over…
I’d use heavier material for the top. The 3/4″ poplar just isn’t very beefy when you lean on the edge of the table. Maybe a nice 5/4″ birch plywood top with some hardwood tacked to the edge.
I’d at least make the tabletop out of boards that run lengthwise, not side-to-side. I think that’s giving me even more bend and stress on the biscuit joints.
Eh. Next time.

