
Coffee Shrine
Posted: June 3, 2010 Filed under: Build Leave a comment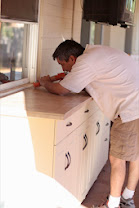
There are few things in life to which I am more devoted than coffee. For me, the proper way to show devotion is maniacal control over as much of the coffee production process as I can muster. And that means a coffee roaster. And a coffee roaster has to live outdoors so the smoke doesn’t kill your family or pets.
We had this really useful little (little!) counter outside our kitchen window. I put a half-screen on the window, so we can use it as a pass-through from the kitchen to the back yard. I want to make that into a huge counter over spacious cabinets.
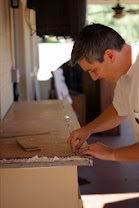
I assembled and leveled the cabinets on adjustable feet to keep them off the ground. I added a power strip inside so I could leave everything plugged in. Then I put plywood and backer board over the whole thing, rented a tile saw and tiled it with 20” ceramic tile and a fetching bull-nose around the edge.
I think this shows an appropriate level of devotion.
Go to Stanley’s Immediately
Posted: June 2, 2010 Filed under: Uncategorized Leave a commentNow look, this is very easy:
- Go to Stanley’s Homemade Polish Sausage on McDowell Rd in Phoenix.
- Approach the woman behind the counter and say “I’d like some bacon, please.”
Be firm, but polite. Do not risk losing your Stanley’s privileges. - Take the bacon home, remove the skin, and cook it.
- Eat it.

Mmmm, bacon.
It’s awesome. Meaty like ham. Not at all salty, not sweet, and nicely smoky. Buy more than you need because you’ll eat more than you should.
Weekend Project: Book Rack
Posted: May 31, 2010 Filed under: Build Leave a commentI’ve been reading Knock-off Wood a lot lately, and they had these plans for a book rack.
They’re great for my girl’s room for three reasons:
- The books face straight out (so you can see ’em)
- It sits flat to the wall (12″), so I can put it behind her door.
- It’s sturdy enough that she could climb it (not that she should)
Here’s the finished product:

Hooray, books!
I deviated from the original plans in a few places:
- No arches. I didn’t want to cut them so I tell myself they didn’t match her room anyway.
- Routed outside edges and rails dress it up a bit
- Taller shelves (15″ instead of 12″)
- Notches for her chair rail & baseboards
I’m particularly happy with how the baseboards came out, but I sort of messed one thing up: when I routed the outside edges, I didn’t stop at the baseboards. The round-over goes all the way to the floor. Whoops.
This was a great project. It took me 2 days of carpentry (with the assistance of a 5-year-old), plus a day of painting. I spent about $90 on materials & a few tools that made it go smoother. I’d recommend it of you have an unused wall in your place.

