
A Slingshot Ammo Catch Box
Posted: November 2, 2013 Filed under: Build Leave a commentA while ago, I got a slingshot and started trying to scare the doves away from my pool so they will poop somewhere else.
It didn’t scare the doves away, but it turns out shooting a slingshot is challenging and fun. It also scares the neighbors less than firearms or air guns.
The Problem: Lost Ammo
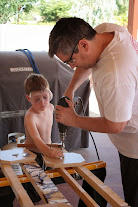
I can shoot the same airsoft BBs I shoot at the doves, but bigger ammo is much more satisfying (and results in less hand-slap from the bands). The bigger ammo isn’t as cheap as the plastic BBs. At 80¢ each for .38 cal steel balls, it’s sort of important that I get to shoot each one at least a few times before it gets lost.
The Catch Box
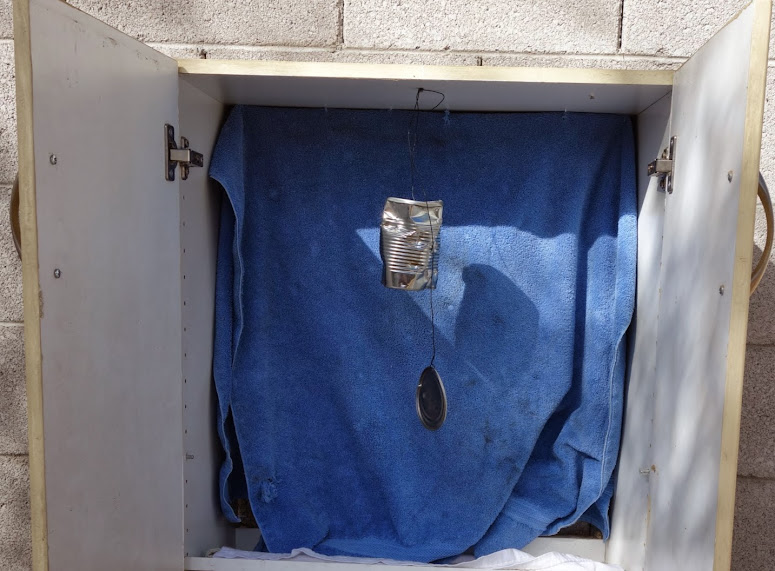
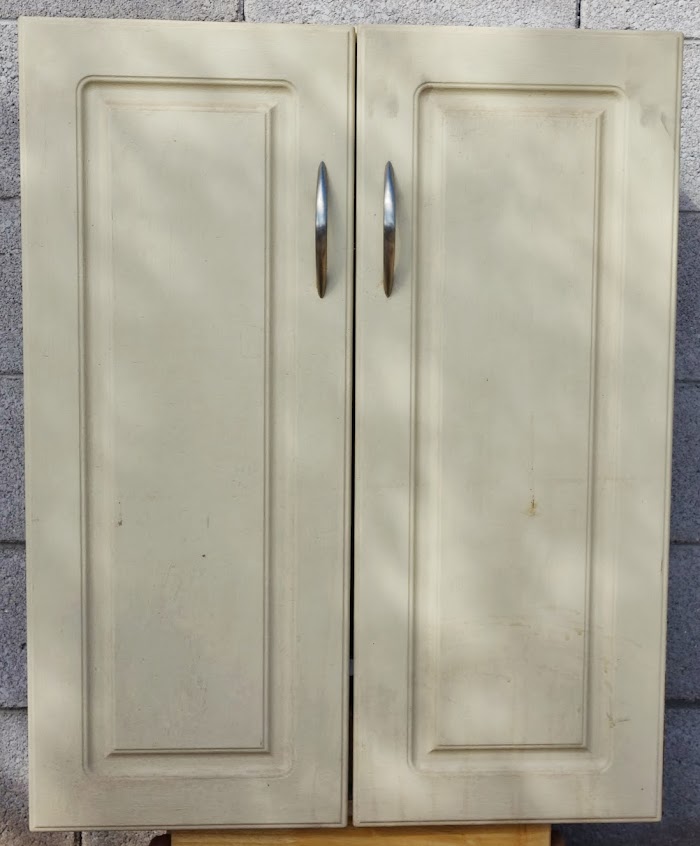 It’s made from the cabinet that used to be my coffee shrine before I built a new one. I just stapled a towel to the ceiling inside it to arrest the shots. It already had a screw that used to hold a power strip in place, so I used that to hang an aluminum can from a wire.
Turns out an aluminum can isn’t really a good target for a steel ball flying at a couple hundred feet per second. It gets sort of shredded after a couple of hits. Steel cans work better. They still look destroyed, but they actually hold up pretty well. This one has been hit at least a few dozen times.
It Works!
The box is performing well. It traps about 1/2 of the shots inside. Another 40% can be found on the ground right in front of the trap. The remaining 10% get away and I have to go track them down, but none of them have made it 33 feet back to where I’m standing to hit me in the eye.
Industrial Chic Lamp
Posted: September 8, 2013 Filed under: Build 1 CommentI needed a lamp for my new desk, so I built one.
The One I’m Sort Of Copying

My lovely wife found this lamp that she liked the look of. At the time of this post, it was available from Shades of Light for $225.
Looking at it, you can see it’s just made of steel pipe parts. It doesn’t even look like any are custom cut & threaded. It looks like there may be a union in the middle of the longest pipe, possibly to make shipping and assembly easier, but it doesn’t look like anything I couldn’t do with a trip to the Orange Store or Blue Store.
I had a few hours to spend on a project on Labor Day, so I gave it a shot.
The Deal
I’m doing this because I feel like doing a project. If I can build a lamp my wife likes as much as the one on the web site, we’ll keep it. If my silly project turns out looking cheap & crappy or if she just has her heart set on another one, I’ll abandon mine in the alley and buy her whatever lamp she likes.
Finding Parts

I decided to use a pendant light that’s designed to hang from its cord, because I don’t actually know what kind of hardware converts from plumbing to lamp fixtures. If it hangs on its own wire, I can sort of cheat and just run the wire through the pipe.
I was hoping to have something that comes out looking like this one from Restoration Hardware, but made out of pipe like the first one.
 I went to my local Orange Store and picked out a vintage-looking pendant lamp. It’s made for mounting to a box in the ceiling, so (as with all good projects), I’ll have to start by cutting up a perfectly good product.
The rest was just parts.
Parts List
- The pendant lamp
($40) - 6′ galvanized 1/2″ pipe, threaded at both ends ($18)
- 2 ea. 8″ nipples, galvanized ($3 ea.)
- Floor flange, galvanized ($7)
- 1/2″ tee, galvanized ($2)
- 2 ea. 45° elbows, galvanized ($2 ea.)
- 90° elbow, galvanized ($2)
- close nipple ($1)
- 1×12 board, 14″ long to use as the base (I had this already)
- 4 ea. 3/4″ wood screws to attach flange to base
- 12′ extension cord, brown ($3)
- Plug-in dimmer ($8) unless you have a switched outlet
- Solder & heat shrink
Building It
Take the perfectly good pendant lamp and pull the cord out from the ceiling mounting fixture. This will leave you with a lamp & wire, but no housing to hang it from anything.
 To make the head assembly, thread the pipe fittings over the wire in this order:
- 90° elbow
- 8″ nipple
- 45° elbow
- 8″ nipple
- 45° elbow
Screw everything together, being careful not to twist the wires on the inside as you do so. Now is a good time to check the height. I wanted mine hanging 3-4″ below the pipe. Adjust the lamp until you have just enough exposed wire to hang right.
Cut the receptacle end off of the extension cord (that’s 2 perfectly good things we’ve ruined so far!) and fish it through the tee fitting. The wire should make a 90° turn inside the tee. Next, feed the wire through the 6′ pipe. This was tricky for me because the stranded extension cord wire wasn’t rigid enough to push through all 6 feet. I had to tie a screw to a string and send the string through first. After that, I could use the string to pull the wire back.

Don’t attach the tee, the 6′ pipe, or the head assembly yet.
Split the wires on both the lamp and the extension cord. Thread heat-shrink tubing over the wire. I always forget that part. Figure out which side is the common wire and hook the wire going to the wider prong on the extension cord to the white wire on the lamp cord. Strip a lot of the wire (like 1″) and twist them together. Solder it up. This is going to live forever inside a pipe where you’ll never be able to inspect it again. It’s important that you get a good mechanical and electrical connection between these wires. I put heat shrink over each wire and a bigger one around the whole connection. Shrink the heat shrink.
Test the lamp at this point. If it’s not working, cut your work out of the middle of the wire and start over.
Attach the 6′ pipe to the 45° elbow of the head assembly. Try not to twist the wire as you go.![]()
Attach the tee to the other end of the 6′ pipe. Again, try to keep the wire from twisting as you do this (it’s a bit tricky and a few turns over 6′ of wire will be fine, but don’t let it get kinked).
Attach the flange to the base using wood screws. Insert the close nipple into the tee fitting and have someone hold the lamp so you can screw the base on.
You’re done!
I was going to paint it a cool hammered bronze color, but the galvanized came out looking pretty good, so I’m just going to leave it.
The Cost
It took me 2 trips to the Orange Store (I built the lamp too short the 1st time; the 6 foot height is much better).
I spent about $150 on parts, including the pipes I didn’t use and the paint that we decided not to apply. The whole thing came together in about 3 hours.
The Verdict
We can keep it! It doesn’t look as cool as the $600 Restoration Hardware lamp, but it looks pretty good and it lights up the desk just like a lamp should.
Chess!
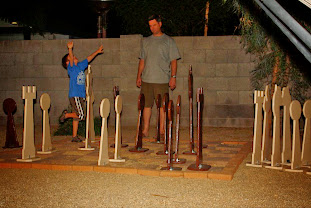
Posted: June 3, 2011 Filed under: Build Leave a commentMy son has been in his school chess club since preschool. He loves playing it. I’m not very good at it (he’s 6 and can beat me sometimes), but there’s one thing I’ve always loved: big garden chess boards that you walk around on top of to move big chess pieces.
So I decided to build one.
The Design
I decided to build the pieces out of flat stock because it’s easy to get, affordable, and I know how to work it. I decided on a hinged base so they would fold and lay flat.
Aside: I discovered http://amazonsupply.com/ during this project. It’s awesome!
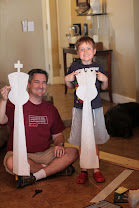 My son helped me design the pieces. He drew what he thought they should look like on Post-It notes and I sketched them on big butcher paper to make templates. The King is three feet tall. The Pawns are 2 feet tall and everything else is somewhere in between. It only takes 6 templates to make all 32 pieces, so that went pretty quick.
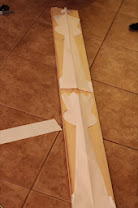 Then we traced the templates on to 1×8” pine. I bought 6’ pre-cut boards of select grade stuff and put 2 tall pieces or 3 pawns on a board.
Cutting
This part takes a while. You have to carefully cut 32 pieces out of 8” boards with a jigsaw or bandsaw. I bet if I had a bandsaw, I could cut out a stack of 2-4 pieces at a time. I don’t have a bandsaw. I bet if I transferred the templates to a piece of hardboard first, I could have cut them using a straight-cutting router bit with a guide bearing. I didn’t do that. I cut all 16 pawns the hard way.
Then I sanded everything and routed the edges so they’re rounded over. It makes the pieces feel nice in the hand.
Painting
My son picked the colors. He said the white side should match the rocks in our back yard and the black side should match the pool fence. He got his design skills from his mom. We put drop-cloths in the yard and put 1 coat of primer followed by 2 coats of paint on both sides of all 64 pieces (including bases). This was a good family part of the project: no power tools or loud noises, just a lot of painting.
Assembly
This was another good family part of the project. Each piece needed a hinge attaching the base to the figure. Then each base needed an angle bracket and each figure needed a threaded insert. When you stand the piece up, a thumb screw goes through the bracket and into the insert.
The Board
The base of each piece is 9¼” wide. I went with 12” pavers to be the black squares on my board. The white squares are just the same gravel as the rest of the yard. It didn’t look quite right until I added the border of bricks all the way around. It makes it look like the white squares along the edges are part of a chess board, not encroaching yard.
Playing
All together, this set took about 10 weekends of work (not totally full, just… a lot of work), but I’m glad I did it.

